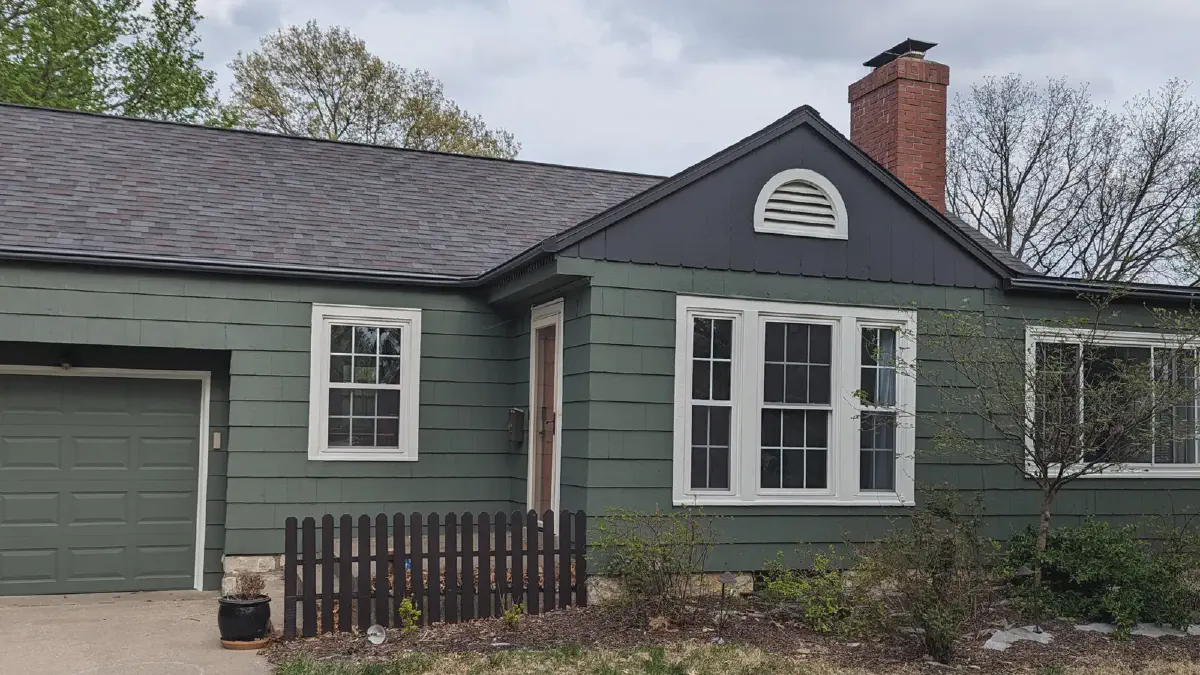
Cedar shake shingles can split and curl when not properly cared for. While replacing damaged shingles sounds straightforward, here's what to look out for.
Why Painting Shake Shingles Is Tricky
Cedar shakes offer beautiful texture and depth—but they come with quirks that can’t be ignored.
Shakes look great when freshly painted—but the path to that polished finish isn’t always simple. Aging shingles, varied textures, and hidden staining can complicate the process.
Tannin staining may take time to appear—but once it shows up, it’s not going away without the right prep.
Cedar shakes in particular behave differently from lap siding or trim boards. They expand, contract, split, and curl—and no two walls ever age the same way.
Understanding Tannin Staining
Tannins are natural compounds in cedar that can bleed through paint, leaving brown or yellow stains.
Tannin bleed is one of the most common issues when painting cedar shake. These natural oils can seep through paint layers, especially after heavy rain or sun exposure.
The result? Ugly brownish streaks or shadowy discoloration, even on freshly painted surfaces. Tannin staining can appear days, weeks, or even months after the job is “done.”
How to Prevent Tannin Bleed
Blocking tannins starts with proper prep and a high-quality oil-based primer.
Latex primers can sometimes hold up on siding—but not on shakes. For cedar, oil-based primers are still the gold standard. They create a durable barrier that locks in tannins and keeps bleed-through from spoiling your finish.
Spot-priming isn’t enough. If staining is a concern, the entire surface should be sealed—especially on older shakes or in high-moisture zones. Your topcoat is only as good as the primer underneath.
Shingles Can Split or Cup
Weathered shakes may crack, curl, or become uneven—but some of that variation is perfectly natural.
Cedar shingles are exposed to the elements, and over time, they can develop cupping or minor splits. This isn’t necessarily a flaw—it’s a natural part of how cedar weathers. Some variation is expected, and even welcome, as it gives the exterior a more organic, lived-in look.
When Is It Too Much?
Light curling and surface checking are common. But if a shingle is split all the way through or has warped enough to create a gap, it may need replacing.
It’s a Judgment Call
Deciding what to keep and what to swap is part science, part aesthetics. A little character adds charm—but if one section stands out too much, it might be worth the effort to blend things better.
Matching Thickness Matters
Mixing thin and thick shingles on the same wall can create noticeable visual disruption.
Cedar shingles are typically ⅜" (thin) or ⅝" (thick). Using the wrong thickness—especially in a patchwork repair—can create visible bumps or valleys.
Think Before You Swap
Using a thin shingle in a thick wall might pass with careful feathering. But going the other way—thick on thin—can cause alignment issues and make repairs look bulky or awkward.
Your Neighbors Will Notice
If the difference is visible from the street, it won’t matter how well it’s painted. Sometimes the biggest difference between a good and great result is those subtle visual cues.
Surface Texture Is Often Overlooked
Differences in surface grain or pattern between old and new shingles can stand out—sometimes more than color itself.
New shingles usually have two faces—one grooved, one smooth. Older shingles might be smooth from decades of paint or grooved and worn down.
Grooved vs. Smooth
Matching groove to groove is usually simple. Matching smooth to smooth is trickier, especially if old shingles have been painted multiple times and lost their original texture.
Sanding Is Sometimes Necessary
If visual consistency is important, you may need to sand down replacement shingles. It’s a small extra step, but worth it in high-visibility areas like the front elevation.
Matching paint color is important—but matching shingle texture is often what people really notice.
Setting Realistic Expectations
A professional painter helps homeowners understand what can—and can’t—be controlled with shake siding.
There’s only so much a brush and roller can do. If the shakes are irregular, faded, or overly patched, the final look might still show some of that character.
Clear communication is key. The goal isn’t to deliver perfection—it’s to deliver craftsmanship that respects the material and fits the home.
Plan Your Project the Right Way
Knowing the limits of shake siding helps ensure better outcomes and fewer surprises.
If you’re repainting or repairing shakes, ask the right questions upfront. That includes whether primers will block tannins, whether replacement shingles will match, and what compromises might be necessary.
Start here: 12 Questions to Ask Before You Hire a Painter. You’ll get a better job—and a smoother process—when everyone’s on the same page.
For related challenges, read up on plaster and drywall repair or how to approach bold tones in our dark paint colors tips. And if you’re gathering bids, don’t miss our top 5 uninsured contractor questions.
Ready to Talk It Through?
Every shake siding project is unique, and we’re happy to take a look. You can book an estimate through our online form—just pick a time that works for you. The visit usually takes under 30 minutes and gives you clear answers, not a sales pitch.

Latest Posts
How to Test Paint Colors
20 Apr, 2025
Solid Agreements
22 Oct, 2023