Something we see quite often on older interior projects is how craftsmen carpenters designed trim to hide wood movement.
A Look at Traditional Carpentry
Traditional methods often used multiple pieces that accommodate expansion and contraction. This approach helps wood shift without creating large, visible gaps.
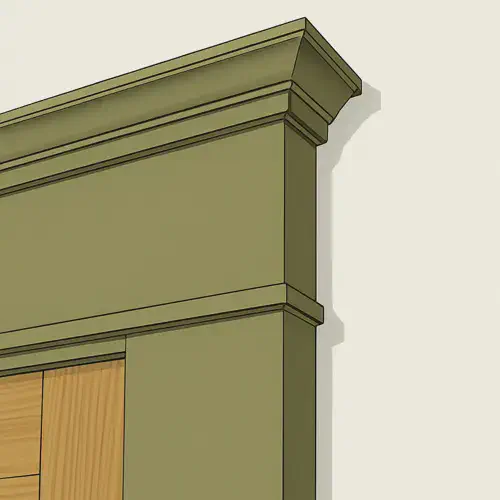
Layers of Wood Components
Older builders would layer boards so each one could move independently. Even when humidity changed or the house settled, tight seams were easier to maintain.
Hidden Flexibility
Trim was made to “float” rather than being perfectly flush. Subtle shifts rarely marred its appearance, since the wood had enough room to expand or contract.
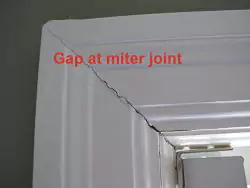
Newer construction (“newer” since 1940) was built rapidly for the post-war Baby Boom. And that meant miter joints.
Why Miter Joints Fail
Miter joints rely on fewer cuts, saving time and materials, but they open easily as the seasons shift. Once pulled apart, those tight corners become uneven or start to crack.
House Movement Over Time
Foundations can settle unevenly, pulling trim in different directions. That stress adds up and can force corners to split or develop noticeable gaps.
Climate Effects on Wood
Moisture and temperature swings cause boards to swell and shrink. This constant cycle puts pressure on each joint, making mitered corners prone to separation.
Designing Out Gaps: Alternate Joint Types
Older joint styles used angled and overlapping parts to hide movement. By acknowledging slight shifts, these methods minimized the visibility of gaps.
Coping Instead of Mitering
A coping cut follows the profile of an adjoining piece, so even if boards warp, the joint remains snug. It’s especially handy in crown molding where corners might not meet at perfect angles.
Multi-Piece Molding
Combining several segments at corners lets each piece adjust on its own. This approach spreads out stress, reducing the likelihood of any single gap becoming too large.
Seasonal Gaps vs. Settlement Gaps
It’s important to figure out whether gaps arise from normal climate changes or deeper structural issues. That knowledge guides whether a simple fix or more intensive work is needed.
Identifying the Root Cause
Seasonal gaps often appear in several spots and may close up again. Settlement gaps persist or worsen, suggesting a shifting foundation that needs closer attention.
Subtle vs. Severe Shifts
Tiny cracks might need only fresh caulk and paint. Larger openings may indicate active movement, requiring deeper carpentry or structural evaluation.
How Caulk Helps (and Doesn’t)
Caulk can seal minor cracks, but it won’t correct underlying movement. Big shifts tend to reopen gaps, no matter how carefully you apply sealant.
Temporary Fixes
A new bead of caulk hides hairline cracks and blocks moisture. However, repeated expansion and contraction can eventually make it fail in high-movement areas.
Beyond Caulking
If joints constantly separate, a more flexible design may be needed. Otherwise, it’s like repainting over builders paint without proper prep: the issue will return.
Construction Economies and Trade-Offs
Post-war building booms relied on fast, simple techniques, and miter joints fit that bill. Over time, these choices often create recurring trim problems.
Post-War Building Practices
Quick construction and minimal labor were vital then, but not all details aged gracefully. Homeowners today may see persistent flaws from those shortcuts.
Time vs. Quality
More intricate joinery means extra cutting and fitting. Though pricier at first, it usually leads to fewer repairs in the long run.
Long-Term Maintenance for Painted Trim
Even high-quality trim needs periodic attention to remain gap-free. Staying ahead of small issues can extend the finish’s lifespan.
Periodic Inspections
Check corners for cracks every few months. If you spot gaps near nail pops or doors, a deeper structural check may be wise.
Protective Primer and Paint
Quality primers and paints slow moisture absorption, limiting swelling and contraction. Thorough prep work also prevents frequent re-caulking or re-painting.
Tips for Homeowners and DIYers
Simple steps help prevent big problems. Knowing when to tackle a project yourself or call in help makes your trim more durable.
DIY Tools and Techniques
A decent caulk gun, flexible fillers, and proper cleaning handle most small cracks. If you’re updating interior colors , thoroughly prep surfaces for the best bond.
When to Call a Pro
Larger or recurring gaps can point to structural shifts. Consider professional carpentry or painting services, check customer reviews , and see 12 Questions to Ask Before You Hire a Painter before deciding.
Ready to Schedule a Consultation?
If you’re tired of chasing trim gaps, we have a simple online booking form that lets you pick a convenient time. It’s a relaxed, no-pressure conversation about your home’s needs, so we can suggest practical, budget-friendly solutions. Scheduling now can spare you bigger headaches later, and we’ll help keep your trim looking its best.

Latest Posts


How to Prepare for Professional Painters
02 Jan, 2026
Interior vs Exterior Paint: What’s the Difference?
02 Jan, 2026
How to Test Paint Colors
20 Apr, 2025
Essential Elements of a Painting Agreement
22 Oct, 2023